Dialog Android
Table of Content
Alert Dialog box is a small window which pops out on a screen to display particular events. This helps to draw users attention before moving further in the application. Alert dialog also comes with pre defined components. It usually have two buttons one is positive (OK) and another one is Negative (Cancel) button. You can also define different actions on buttons clicks.
In this tutorial we will be creating two different Alert Dialog boxes. We need to create an object of AlertDialog Builder, which is inner class of AlertDialog to display the dialog box
AlertDialog.Builder builder = new AlertDialog.Builder(this);
| Methods names | Description |
|---|---|
| setIcon(Drawable icon) – builder.setIcon(R.drawable.icon); | This method used to set icon to Alert Dialog. |
| setMessage(CharSequence message) – builder.setMessage(“Select you gender”); | This method is used to display content on dialog window. |
| setTitle(CharSequence title) – builder.setTitle(“Android Aura”); | This method is used to set title to your dialog window |
| setCancelable(boolean cancelable) – builder.setCancelable(false); | This method is used to set if dialog box should cancel or not if user clicks outside the window |
| dismiss(); | This method will dismiss the dialog window |
| hide(); | This method will hide the dialog box |
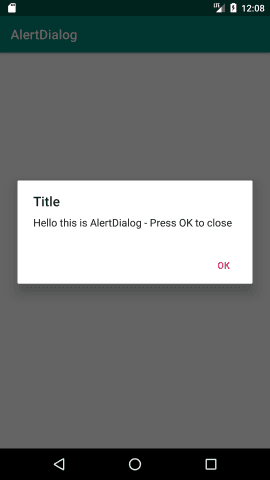
In the given example below we will use one button. We will call method to display alert dialog box. Dialog box will open with message “Hello this is AlertDialog – Press OK to close”. Once you click on “OK” button than dialog box will dismiss. Here we use dialog.cancel() method to dismiss the dialog window.
Example of Alert Dialog box in android
MainActivity.java
package com.techstackguru.alertdialog;

import androidx.appcompat.app.AlertDialog;
import androidx.appcompat.app.AppCompatActivity;
import android.content.DialogInterface;
import android.os.Bundle;

public class MainActivity extends AppCompatActivity {

    @Override
    protected void onCreate(Bundle savedInstanceState) {
        super.onCreate(savedInstanceState);
        setContentView(R.layout.activity_main);

        displayalert();
    }

    public void displayAlert() {

        new AlertDialog.Builder(MainActivity.this)
                .setTitle("Title")
                .setMessage("Hello this is AlertDialog - Press OK to close")
                .setPositiveButton("OK", new DialogInterface.OnClickListener() {
                    public void onClick(DialogInterface dialog, int id) {
                        dialog.cancel();
                    }
                }).show();
    }
}
Output

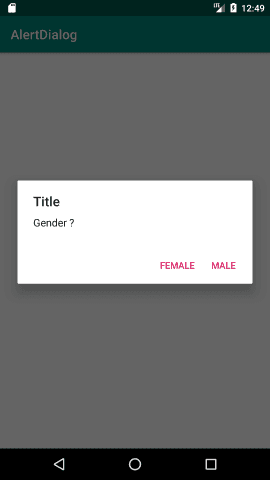
In the second example we will ask user to select their gender. Here we will use two buttons Positive and Negative. Once user clicks on Positive button than “Male” selected Toast occurs and if users clicks on Negative button than “Female” selected message will Toast.
public void displayalert() {
       new AlertDialog.Builder(MainActivity.this)
              .setTitle("Title")
              .setMessage("Gender ?")
             //.setIcon(R.drawable.image)
                      .setPositiveButton("Male",
                     new DialogInterface.OnClickListener() {

                         public void onClick(DialogInterface dialog, int id) {
                             Toast.makeText(MainActivity.this,"Male Selected",Toast.LENGTH_SHORT).show();
                              dialog.cancel();
                            }
                        })
          .setNegativeButton("Female", new DialogInterface.OnClickListener() {

                    public void onClick(DialogInterface dialog, int id) {
                        Toast.makeText(MainActivity.this,"Female Selected",Toast.LENGTH_SHORT).show();
                        dialog.cancel();
                    }
                }).show();
    }
Output
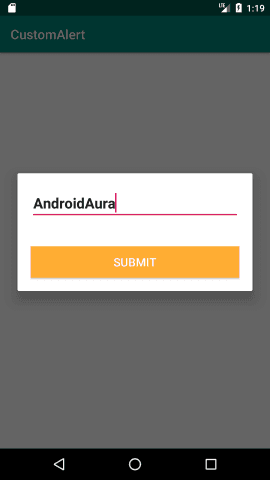
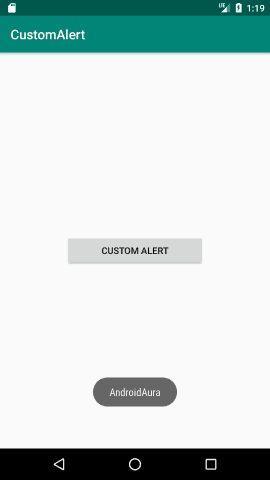
Custom Alert Dialog box example in android
In this example we will show how to use Custom Alert Dialog box. We are using EditText and Button inside Alert Box. Once user input the text and clicks on button, Toast message will be displayed.
MainActivity.java
package com.techstackguru.customalert;

import android.app.AlertDialog;
import android.os.Bundle;
import android.view.View;
import android.widget.Button;
import android.widget.EditText;
import android.widget.Toast;

import androidx.appcompat.app.AppCompatActivity;

public class MainActivity extends AppCompatActivity {

    Button btn;

    @Override
    protected void onCreate(Bundle savedInstanceState) {
        super.onCreate(savedInstanceState);
        setContentView(R.layout.activity_main);

        btn = findViewById(R.id.btn);

        btn.setOnClickListener(new View.OnClickListener() {
            @Override
            public void onClick(View v) {

                showAlertDialog();
            }
        });
    }

  private void showAlertDialog() {
        final AlertDialog.Builder alertDialog = new AlertDialog.Builder(MainActivity.this);
        final View customLayout = getLayoutInflater().inflate(R.layout.custom_alert, null);
        alertDialog.setView(customLayout);

        final AlertDialog alert = alertDialog.create();
        alert.setCanceledOnTouchOutside(false);
        alert.show();

        Button submit = customLayout.findViewById(R.id.submit);
        final EditText et = customLayout.findViewById(R.id.et);

      submit.setOnClickListener(new View.OnClickListener() {
            @Override
            public void onClick(View v) {
                Toast.makeText(MainActivity.this, et.getText().toString(), Toast.LENGTH_LONG).show();
                alert.dismiss();
            }
        });

    }
}
activity_main.xml
<?xml version="1.0" encoding="utf-8"?>
<LinearLayout xmlns:android="http://schemas.android.com/apk/res/android"
    xmlns:app="http://schemas.android.com/apk/res-auto"
    xmlns:tools="http://schemas.android.com/tools"
    android:layout_width="match_parent"
    android:layout_height="match_parent"
    tools:context=".MainActivity">

    <Button
        android:id="@+id/btn"
        android:layout_width="match_parent"
        android:layout_height="wrap_content"
        android:layout_gravity="center_vertical"
        android:layout_marginLeft="100dp"
        android:layout_marginRight="100dp"
        android:text="Custom Alert" />

</LinearLayout>
custom_alert.xml
<?xml version="1.0" encoding="utf-8"?>
<LinearLayout xmlns:android="http://schemas.android.com/apk/res/android"
    android:id="@+id/ll_submitreport"
    android:layout_width="match_parent"
    android:layout_height="wrap_content"
    android:focusable="true"
    android:focusableInTouchMode="true"
    android:orientation="vertical">

        <EditText
            android:id="@+id/et"
            android:layout_width="match_parent"
            android:layout_height="wrap_content"
            android:layout_margin="20dp"
            android:hint="Enter text"
            android:textSize="22sp"
            android:textStyle="bold" />

        <Button
            android:id="@+id/submit"
            android:layout_width="match_parent"
            android:layout_height="wrap_content"
            android:layout_margin="20dp"
            android:background="@color/colorOrange"
            android:text="Submit"
            android:textColor="@color/colorwhite"
            android:textSize="18sp" />

</LinearLayout>