Android Spinner
In Android development, a Spinner control allows a user to choose one from a set of items quickly and easily. It has proved to be a very handy UI (user interface) element for this reason, which is why we see it so often in Android applications these days. An Android Spinner fulfils its purpose of giving choices with the help of a drop down list.
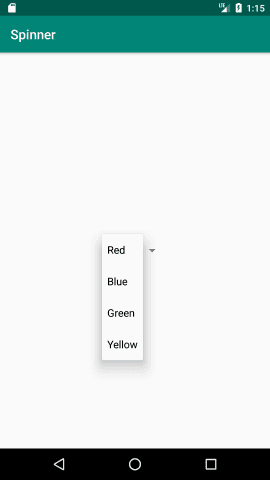
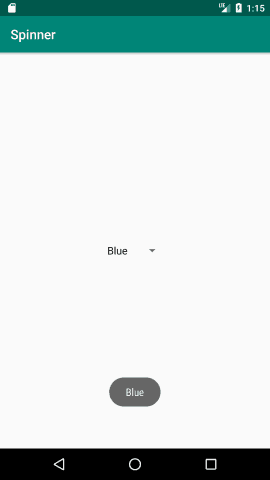
In its default state, an Android Spinner shows a pre-selected default item. Clicking on the Spinner displays a drop down menu that shows all the available items to the user, from which he can select only one. An Android Spinner is particularly useful for Android developers when they have a lot of entries available but want the users to be able to select only one of them.
Spinner in Android Steps
Now that everything has been clarified, it is time for you to learn how a Spinner is used to create a drop down menu in Android.
First, open Android Studio, and create a new project as shown in our earlier tutorials. Name your project “Spinner.” Select a suitable package name for your project. We have used “com.techstackguru.spinner” as our package name.
Now, open your MainActivity.java file to add the following code in it:
MainActivity.java
package com.techstackguru.spinner;

import android.os.Bundle;
import android.view.View;
import android.widget.AdapterView;
import android.widget.ArrayAdapter;
import android.widget.Spinner;
import android.widget.Toast;

import androidx.appcompat.app.AppCompatActivity;

public class MainActivity extends AppCompatActivity implements
        AdapterView.OnItemSelectedListener {

    Spinner sp;

    String[] color = {"Red", "Blue", "Green", "Yellow"};

    @Override
    protected void onCreate(Bundle savedInstanceState) {
        super.onCreate(savedInstanceState);
        setContentView(R.layout.activity_main);

        sp = (Spinner) findViewById(R.id.spinner);
        sp.setOnItemSelectedListener(this);

        ArrayAdapter aa = new ArrayAdapter(this, android.R.layout.simple_spinner_item, color);
        aa.setDropDownViewResource(android.R.layout.simple_spinner_dropdown_item);
        sp.setAdapter(aa);
    }

    @Override
    public void onItemSelected(AdapterView<?> arg0, View arg1, int position, long id) {
        Toast.makeText(getApplicationContext(), color[position], Toast.LENGTH_SHORT).show();
    }

    @Override
    public void onNothingSelected(AdapterView<?> arg0) {
        // TODO Auto-generated method stub
    }
}
After adding the code in your class file, open your activity_main.xml layout file to enter the following code in it:
activity_main.xml
<?xml version="1.0" encoding="utf-8"?>
<LinearLayout
    xmlns:android="http://schemas.android.com/apk/res/android"
    android:gravity="center"
    android:orientation="vertical"
    android:layout_width="match_parent"
    android:layout_height="match_parent">

    <Spinner
        android:id="@+id/spinner"
        android:layout_width="100dp"
        android:layout_height="50dp"/>

</LinearLayout>
After adding both the codes in their respective files, you will be ready to obtain your result. The above mentioned codes will give you an output that looks like this: