Rating Bar in Android
An example of a Rating Bar is always present in your Android devices. This popular Rating Bar can be found inside Google Play Store. When you open Google Play Store and tap on any app present on its main activity, a new page opens.
This page shows you details about the app you selected, such as user reviews, number of downloads, an “about” section, etc. It also shows a big-sized floating point number standing above 5 stars, showing the current average rating of the app. If you have this app already downloaded in your device, you would see a Rating Bar asking you to “rate this app.”
Apart from online shopping apps where Rating Bars are easily found, you can also see a Rating Bar in food delivery marketplace apps, such as foodpanda. Here, a Rating Bar is used to rate services of a restaurant. Usually, in these Android apps, Rating Bars for restaurants are placed on their respective pages.
Now, open the MainActivity.java class file in order to enter the following code:
MainActivity.java
package com.techstackguru.ratingbar;
import android.os.Bundle;
import android.view.View;
import android.widget.Button;
import android.widget.RatingBar;
import android.widget.Toast;
import androidx.appcompat.app.AppCompatActivity;
public class MainActivity extends AppCompatActivity {
RatingBar rb;
Button button;
@Override
protected void onCreate(Bundle savedInstanceState) {
super.onCreate(savedInstanceState);
setContentView(R.layout.activity_main);
rb = (RatingBar) findViewById(R.id.rating);
button = (Button) findViewById(R.id.button);
button.setOnClickListener(new View.OnClickListener() {
@Override
public void onClick(View v) {
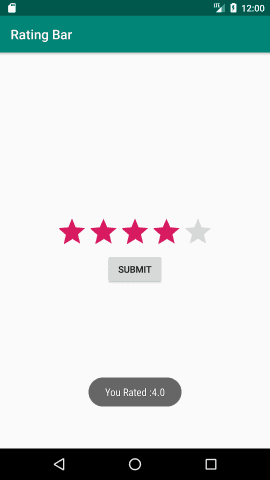
String rated = "You Rated :" + rb.getRating();
Toast.makeText(MainActivity.this, rated, Toast.LENGTH_SHORT).show();
}
});
}
}When you are done coding in your MainActivity.java class file, open the second file of your project, i.e. activity_main.xml layout file. After opening this file, add the following code in it:
activity_main.xml
<?xml version="1.0" encoding="utf-8"?>
<LinearLayout xmlns:android="http://schemas.android.com/apk/res/android"
    android:gravity="center"
    android:orientation="vertical"
    android:layout_width="match_parent"
    android:layout_height="match_parent">

    <RatingBar
        android:id="@+id/rating"
        android:layout_width="wrap_content"
        android:layout_height="wrap_content"
        android:saveEnabled="true"
        android:numStars="5"/>

    <Button
        android:id="@+id/button"
        android:layout_width="wrap_content"
        android:layout_height="wrap_content"
        android:p="Submit" />

</LinearLayout>
After successfully entering both the above-mentioned codes in their respective files, you will be ready to launch your project and view the output. By using the codes we have shown, your output would look like the following illustration: