Seekbar in android
A Seek Bar, in Android, is an extension of ProgressBar. What makes the two different is the fact that a Seek Bar adds a thumb that a user can drag by putting his finger on it and moving the finger. A SeekBar in Android can be of many types, such as a horizontal SeekBar, vertical SeekBar, custom SeekBar and many more. However, the horizontal SeekBar is the most common and the default style of SeekBar in Android. Also, this is the style that we will show you how to create in this tutorial. A developer must know what kind of SeekBar style suits his purpose and choose accordingly.
Having a SeekBar in an Android user interface is extremely important. This is because a SeekBar enables a user to select from a number of integer values so that he can choose a value between minimum and maximum to set it as the current progress level. If you still have not been able to picture what a SeekBar in Android looks like, a few examples of SeekBar are the brightness control, volume control and flashlight intensity control bars of your device.
Open your “MainActivity.java” file, and type in the following code:
MainActivity.java
package com.techstackguru.seekbar;
import android.support.v7.app.AppCompatActivity;
import android.os.Bundle;
import android.widget.SeekBar;
import android.widget.TextView;
public class MainActivity extends AppCompatActivity {
TextView tv;
SeekBar sb;
@Override
protected void onCreate(Bundle savedInstanceState) {
super.onCreate(savedInstanceState);
setContentView(R.layout.activity_main);
tv = (TextView) findViewById(R.id.textview);
sb = (SeekBar) findViewById(R.id.seekBar);
sb.setOnSeekBarChangeListener(new SeekBar.OnSeekBarChangeListener() {
public void onProgressChanged(SeekBar seekBar, int progress, boolean fromUser) {
tv.setText(String.valueOf(progress));
}
public void onStartTrackingTouch(SeekBar seekBar) {
}
public void onStopTrackingTouch(SeekBar seekBar) {
}
});
}
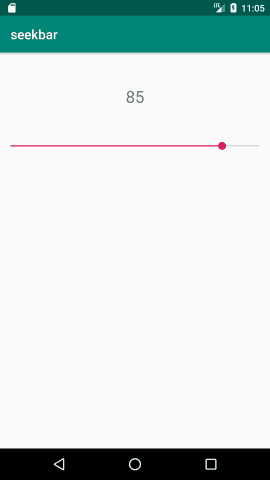
}Now, open your “activity_main.xml” layout file for UI designing, and type in the following code:
activity_main.xml
<?xml version="1.0" encoding="utf-8"?>
<LinearLayout
    xmlns:android="http://schemas.android.com/apk/res/android"
    android:layout_width="match_parent"
    android:layout_height="match_parent"
    android:orientation="vertical">

    <TextView
        android:id="@+id/textview"
        android:layout_width="match_parent"
        android:layout_height="wrap_content"
        android:layout_marginTop="50dp"
        android:gravity="center"
        android:p="10"
        android:textSize="25sp" />
    <SeekBar
        android:id="@+id/seekBar"
        android:layout_width="match_parent"
        android:layout_height="wrap_content"
        android:layout_marginTop="50dp"
        android:max="100"
        android:progress="10"/>

</LinearLayout>
When you are done with adding the codes in both the files, you will get your output. The codes mentioned above will give you the following SeekBar: