
List View in Android
Android List View is used by Android developers to create a vertical list for a group of items or options. Apart from containing a number of items, the list can also be scrolled up and down.
The convenience of being able to scroll the list is present in the default state of List View. For this reason, Android app developers do not have to make the list scrollable with the help of other View tools, such as Scroll View.
Basically, Android app developers use the List View option when they have more than one item falling in the same category. The simplest and the most common example of List View can be seen on your own phone contacts page. This page consists of your phone contacts arranged in a List View, and selecting one of these contacts displays details about the contact.
Adapter and Different Types of Adapter
An adapter is a pathway between user interface (UI) element and data source. In ListView, Adapter classes are used to add the required data in the list. An Adapter pulls the data from a data source, such as array and database, and transfers the data to the list itself.
Basically, an Adapter sends the list data to AdapterView, from which View takes the data and shows it on different views, such as List View, Spinner and Grid View. In actuality, AdapterView has many subclasses, and one of those is ListView. A ListView can be filled if it is bound to an Adapter, which collects data from a foreign data source and develops a View that displays all the data.
In Android, there are four main types of Adapter
ArrayAdapter: It is used when our data source is an array or list. For example, a list of names, countries, contacts, etc. As a default, ArrayAdapter develops a separate view for each item of the list and places them in a single TextView. It is noteworthy that you can store your list items on the strings.xml file as well.
CursorAdaptor: It is used when the source of data is a cursor.
SimpleAdapter: It is mainly used to accept a static data that is defined in resources, such as database or array.
BaseAdapter: It is the parent adapter of the rest of the types of adapter. Being a generic implementation for all the above-mentioned adapter types, BaseAdapter is used in the views according to our requirements.
ListView in Android Steps
Now that you have learned all the basics of ListView, let us show you how to create a ListView from scratch.
MainActivity.java
package com.techstackguru.listview;
import android.support.v7.app.AppCompatActivity;
import android.os.Bundle;
import android.widget.ArrayAdapter;
import android.widget.ListView;
public class MainActivity extends AppCompatActivity {
ListView lv;
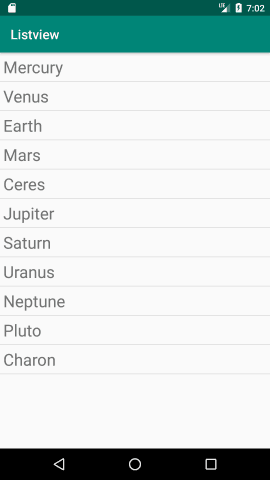
String planets[] = { "Mercury", "Venus", "Earth", "Mars", "Ceres",
"Jupiter","Saturn","Uranus","Neptune","Pluto","Charon" };
@Override
protected void onCreate(Bundle savedInstanceState) {
super.onCreate(savedInstanceState);
setContentView(R.layout.activity_main);
lv = (ListView)findViewById(R.id.listview);
ArrayAdapter arrayAdapter = new ArrayAdapter(this,
R.layout.activity_list, R.id.textView, planets);
lv.setAdapter(arrayAdapter);
}
}The above mentioned code determines what data our ListView will display, what format it will use to do so and so on. In order to achieve that, we need to use a set of data and a View, into which the Adapter will convert the data. Therefore, as you can see in the file above, we have chosen a specific dataset (planet names) to be used in the project and added it in this file.
activity_main.xml
<?xml version="1.0" encoding="utf-8"?>
<LinearLayout xmlns:android="http://schemas.android.com/apk/res/android"
    android:layout_width="match_parent"
    android:layout_height="match_parent"
    android:orientation="vertical">

    <ListView
        android:id="@+id/listview"
        android:layout_width="match_parent"
        android:layout_height="match_parent" />

</LinearLayout>
In the code mentioned above, it is clear that we have defined the characteristics of our ListView, such as its width and height. Other than that, we have chosen a LinearLayout for our project with a vertical orientation and fixed a specific height and width for it. However, all this would be useless without our code in MainActivity.java class file, which contains the most important instructions. Now, create a new XML layout file, name it “activity_list.xml” and add the following code in it to fulfill the remaining requirements:
activity_list.xml
<?xml version="1.0" encoding="utf-8"?>
<LinearLayout xmlns:android="http://schemas.android.com/apk/res/android"
    android:layout_width="match_parent"
    android:layout_height="match_parent"
    android:orientation="vertical">

    <TextView
        android:id="@+id/textView"
        android:layout_width="match_parent"
        android:layout_height="wrap_content"
        android:textSize="25sp"
        android:layout_margin="5dp" />

</LinearLayout>
Because the set of data in our List View is just plain p, we would only need a regular TextView widget to display it in our ListView. Let us suppose, if our ListView data had images along with some p, then we would need to use an ImageView widget partnered with a TextView widget to display both the p and the images in the ListView.
Since we have used a TextView widget, we needed to define the characteristics of the p as well. Hence, we have used this code to set different parameters of the p, such as p size, etc.
Output

All in all, creating a ListView is arguably one of the easiest things to do on Android Studio IDE. Although this is just the beginning, we are sure that you will be able to create your own Android application in no time if you continue to learn making new things through our tutorials.


