What are intent in android
Table of Content
In Android, Explicit Intent is the type of Intent that explicitly defines the name of the component to be invoked by the Intent. It means that the app knows what the targeted component is and if it exists on the device or not. For this reason, Explicit Intent in Android is most commonly used for invoking components within an application. In other words, Explicit Intent connects the internal world of an application; this is done by connecting one activity to another.
Types of Android Intent
As it is mentioned before, the answering component of an Android Intent could be from the same app or a different app. This divides the Android Intent into two:
- Implicit Intent
- Explicit Intent
In this article, we will only discuss Explicit Intent and how to implement it in an Android application. However, as far as Implicit Intent is concerned, we have discussed it in a separate tutorial.
Important Methods of Explicit Intent in Android
Android app developers use many methods when it comes to implementing Explicit Intent in an application. Out of those methods, a few methods are very important and basic for the implementation of Explicit Intent. Here are the three most important methods used for Explicit Intent in Android.
- Context.startActivity() This method is used for launching a new activity. It is also used for making an existing activity to perform the operation.
- Context.startService() This method is used for starting a new service. Other than that, it is used for delivering instructions to an existence service.
- Context.sendBroadcast() This method is used for delivering broadcast intent to broadcast receivers.
Explicit Intent in Android Steps
To start the process of coding to implement Explicit Intent in Android, you must open the Android Studio IDE.
MainActivity.java
package com.techstackguru.eintent;

import android.content.Intent;
import android.os.Bundle;
import android.view.View;
import android.widget.Button;

import androidx.appcompat.app.AppCompatActivity;

public class MainActivity extends AppCompatActivity {

    Button bt_one;

    @Override
    protected void onCreate(Bundle savedInstanceState) {
        super.onCreate(savedInstanceState);
        setContentView(R.layout.activity_main);

        bt_one = (Button)findViewById(R.id.bt_one);


        bt_one.setOnClickListener(new View.OnClickListener() {
            @Override
            public void onClick(View v) {
                Intent i = new Intent(MainActivity.this, SecondActivity.class);
                i.putExtra("value", "From Activity One");
                startActivity(i);
            }
        });
    }
}
As you know that we have two screens or activities in our project, this code is for the first screen. With this code, we have defined the basic elements of our first screen and what they will do. For example, we have used the Button widget to give our screen a button, which will take the user to the second screen when used. This is done by using setOnClickListener() method to apply OnClick event on the button.
Now, open the layout file, i.e. activity_main.xml, of your project so that you can add the following code in it:
activity_main.xml
<?xml version="1.0" encoding="utf-8"?>
<LinearLayout
xmlns:android="http://schemas.android.com/apk/res/android"
xmlns:tools="http://schemas.android.com/tools"
android:layout_width="match_parent"
android:layout_height="match_parent"
android:orientation="vertical"
android:gravity="center"
tools:context=".MainActivity">
<Button
android:id="@+id/bt_one"
android:text="Button 1"
android:layout_width="wrap_content"
android:layout_height="wrap_content" />
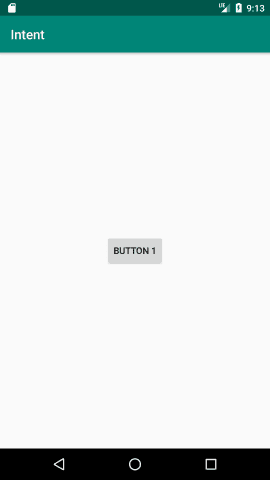
</LinearLayout>With this code, we have designed the UI (User Interface) of our first screen. For example, we have used this code to give the button of the first screen to have the text “Button 1” written on it. After coding in your activity_main.xml layout file, create a new java class file, name it “SecondActivity.java” and add the following code in it.
SecondActivity.java
package com.techstackguru.eintent;
import android.content.Intent;
import android.os.Bundle;
import android.view.View;
import android.widget.Button;
import android.widget.Toast;
import androidx.appcompat.app.AppCompatActivity;
public class SecondActivity extends AppCompatActivity {
Button bt_two;
@Override
protected void onCreate(Bundle savedInstanceState) {
super.onCreate(savedInstanceState);
setContentView(R.layout.activity_second);
bt_two = (Button)findViewById(R.id.bt_two);
bt_two.setOnClickListener(new View.OnClickListener() {
@Override
public void onClick(View v) {
Bundle extras = getIntent().getExtras();
String value = extras.getString("value");
Toast.makeText(SecondActivity.this,"Hello "+value, Toast.LENGTH_LONG).show();
}
});
}
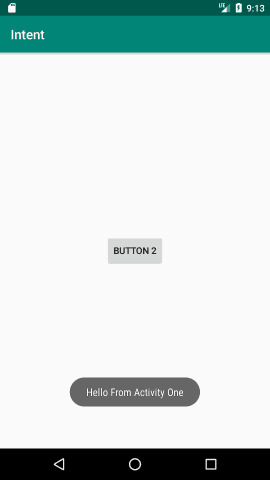
}We have used this java code for our second screen. This code will simply open the layout of the second screen. In this file, the code says that we have given our second screen a button (by using the Button widget) and a message for the user (by using the Toast widget). The Toast message is coded to read “Hello From Activity One” and disappear after a short time.
Now, create a new XML layout file and name it “activity_second.xml” to add the following code in it:
activity_second.xml
<?xml version="1.0" encoding="utf-8"?>
<LinearLayout
    xmlns:android="http://schemas.android.com/apk/res/android"
    xmlns:tools="http://schemas.android.com/tools"
    android:layout_width="match_parent"
    android:layout_height="match_parent"
    android:orientation="vertical"
    android:gravity="center"
    tools:context=".MainActivity">

    <Button
        android:id="@+id/bt_two"
        android:text="Button 2"
        android:layout_width="wrap_content"
        android:layout_height="wrap_content" />

</LinearLayout>
Similar to our first XML layout file, we have used this file and code to design the UI but of the second screen this time. For example, with this code, we have designed the button of this screen to have the text “Button 2” written on it.
After this, create a new AndroidManifest.xml file. This file will contain the information of your package, like application components, such as services, broadcast receivers, activities, etc. In your AndroidManifest.xml file, enter the following code:
AndroidManifest.xml
<activity android:name=".SecondActivity"/>The most important thing to note and remember in this code is the placement of intent filter. Make sure you correctly add the intent filter right after the main activity.
After entering all the above-mentioned codes in their respective files, your project will be ready to be launched. After launching your project, you will be able to see the output of your coding. With our codes, your output would look like this: